Tuesday, May 5, 2015

3ds Max and Photoshop UI scaling issue resolved for 4k Resolution / High Resolution Display (Dell XPS 15, windows 8.1)


Problem

Almost every software has compatibility with high resolution display but for 4K (3200 x 1800) display 3ds max and Photoshop UI elements do not scale. Many of us has encountered this issue in 3ds Max and Photoshop CS 5/6 . The UI of 3DS max gets frozen, fixed and optimized for small text and icons. The text and icons becomes so Tiny that it becomes useless. This problem occurs due to the incompatibility of UI Scaling with higher resolution. Autodesk 3DS max and Photoshop both are optimized for 2048 x 115 or lower resolution ,This problem has occurred in dell XPS 15 which has 3200 x 1800 resolution. 

Solution

To resolve this issue, follow the following steps.


Step 1:
Update your windows version 8.1 and restart your computer/Laptop..

Step 2: 

Right Click on the desktop and Open Graphics Properties


Step 3:

Open your native HD Graphics Card Panel and Click on Display


Step 4:


  • Choose Display Settings
  • Choose 2048 x 115 or lower resolution (according to your display) Instead of 3200 x 1800.


Step 5:

After setting Display Resoulution in Display settings, Apply Changes.


Step 6:

Right Click on Desktop and Open Screen Resolution Panel.


Step 7:


  • Choose "make text and other items smaller and larger"
  • Choose Larger on scale in "Display" Panel and Apply Changes.


Step 8:

Restart your Computer/Laptop.

Step 9:

Test your settings by openning both 3DS max and Photoshop. Both UI would be resonably scaled according to the screen size.

Following were the results of these Settings on 3ds Max and Adobe Photoshop CS 6.


Thursday, March 12, 2015

How to Darken or Vignette the Edge of Photos in Photoshop / Lens Correction Filter


Tutorial 3:

If you want to add a little interest or intensity to an image, a vignette the perfect way to bust out. It brings more attention to the main subject of an image or just to give photos a little more warmth and personality. You can create this effect in photoshop CS2 or later to accomplish this tutorial.

Adobe introduced us to the Lens Correction filter. This filter's main purpose is to help us remove common problems that can be created by camera lenses, such as barrel distortions, chromatic aberration and vignetting. It's a great addition to Photoshop's ever growing collection of photo editing tools, but there's no rule that says you have to use Photoshop the way the folks at Adobe intended. Also the same filter is designed to remove dark edges from a photo also happens to be a great tool to add it too.

Lets start it here.

This would be the photo i would be working on:


Step 1:

Open your photo in photoshop CS 5 or whichever the version you are using. Double click the background layer and rename it to "Layer 0"


Step 2:

Before we darken the edges or vignetting it. First we have to duplicate the original layer so there will be no damage to the original layer.


Step 3:

Apply the lens correction filter. With selected "Layer 2" in the layer palette, Highlighted with blue color. 
Go to the Filter menu at the top of screen, select lens correction. 


Step 4:

Lens correction dialogue box will be opened. Set values of vignette and midpoint according to your photo. After applying adjestments, click ok.


Step 5:

Set the opacity of "Layer 2", on which we have applied the "Lese correction" to 85% or according to your own choice, how dark or light you want the borders to be. 


Final:

Here is the final output of the simple tutorial.


This is how you can make your photos more promminent and enhanced. 

If you have liked the tutorial, please leave your comments.

Wednesday, March 11, 2015

What Cause Black Shadows at the Corner of photos / Vignetting


Examples of Vignetting 


Problems and Solutions:


This is the most simple and common cause, also called vignetting, it can also be caused by an inappropriately sized lens hood or filters - especially when more than one filter is stacked. The extended filter rings or the hood block the lens's view at the corners.

Most likely an incorrectly oriented lens hood. Lens hoods for zoom lenses are petal shaped, with cutouts which are projected to avoid shading the corners. The largest pieces of the petal should be top and bottom, if the hood is rotated it could be the corners of the image are being blocked by the hood.

Some hoods have two long flanges and two short ones. If yours does, then try placing the long flanges on the top/bottom side of the lens rather than the left/right. Because of the native aspect ration of your film plane (chip, sensor, pick a name) (i.e., it is a horizontal rectangle) the long flanges will appear at the left and right of the frame rather than the top and bottom. This is because there is less sensor to "see" the hood on the top and bottom.

There are few other factors too.

  1. Your Flash coverage narrower than the lens's field of view. In this case it can be avoided by using indirect bounce flash.
  2. The polarizing filter is too big for the wide angle setting of the lens, so it "hides" the light in the corners.
  3. Maybe you can find a slimline polarizing filter which has better results.
  4. There is Something in the direction of the light.
  5. You are using a small aperture and longer exposure.
  6. You may have a lens hood that is too narrow for the lens, or a filter rim that is too thick. A polarizing filter, for example, often has a higher ring than other filters.
  7. The small aperture (high f-stop number) makes the lens hood or filter rim come closer to be in focus, so that it causes a black corner instead of just severe vignetting of the corners.
  8. You may have the wrong hood for that lens. A shorter hood may work better for you.It could be you're using a lens designed for a smaller sensoand then so the image circle doesn't illuminate a large enough area, leaving dark corners.
  9. Finally, there could be something loose inside the lens which is causing mechanical vignetting.


Thanks, I will be uploading more helpful material.
If you like this article, Please leave your comments.

Thursday, January 29, 2015

How to apply Vintage Warming Color Effect to a photo in Photoshop CS5/6

Vintage warming filter gives cool color pictures a warm color effect and make them more Stylish and Awesome!

Here is the tutorial to make awesome Vintage Warming Effect!

Vintage Effect - 2:


To create this vintage look open your file using Photoshop CS 6/5 and follow the following steps:
For this tutorial we are using this image.
This photo has taken from this link: 
http://www.santabanta.com/photos/photography/14803047.htm


Step 1:
Create your image as a layer in Photoshop. Double click the "Background" layer and rename it int "Layer 1" or any other name you want to.


Step 1:
Create and adjustment layer over "Layer 1" by clicking on the icon on the 4th number in below image.


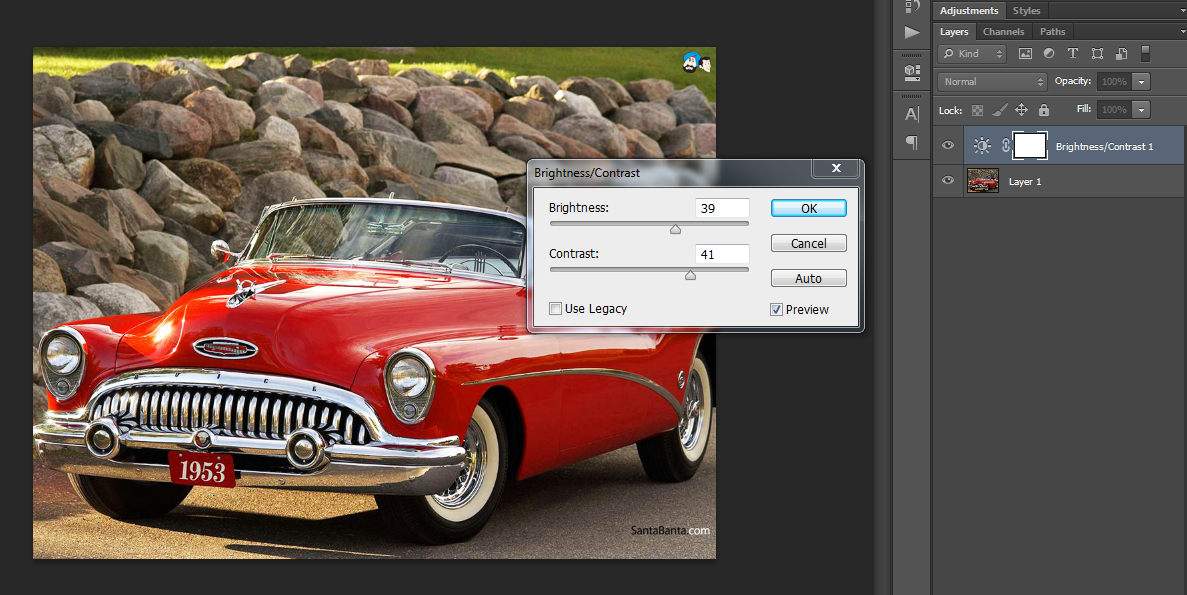
Click on Brightness/Contrast and make following adjustments. You can change the values later according to your image.


Step 2: 
Create another adjustment layer by clicking on Hue/Saturation and make following adjustment.


Step 3: 
Create another adjustment layer by clicking on Curves, select  and make following adjustment.
- click on option button and select "Enhance Per Channel Contrast"
-click on different RED, GREEN AND BLUE channels and adjest their value accordingly.


Step 4: 
Click on "Lens Correction Filer" or Press "Crtl + F" (for Mac users press Cmd + F)
Open Lens correction window and make adjustments according to your camera model.


Step 5: 
Create another adjustment layer by clicking on Hue/Saturation and make following adjustment.


Set Opacity of the layer 47% or according to the look of your photo. It can be changed later.


Step 6: 


 Add another adjustment layer by clicking on Curves, select  and make following adjustment by dragging the curve point below the slope.


Step 7: 

Create another adjustment layer by clicking on "Solid Color". Choose the bright Yellow color (Color Code: #e4ff00) and set the layer Opacity to 31%.


Step 8: 
To create the final look,
Create another adjustment layer by clicking on "Solid Color". Choose the bright the black color,
-Mask the area with round "soft brush" of size 900 px (white color areas will be darkened with shadow)
- Create the mask according to your image.
- Set the opacity of layer to 16%


Here our vintage Warming color effect is complete and the result is astonishing and stylish! 


I hope you have learned this vintage effect, Now you can apply it to any of your photos to make them more stylish.

 If you like my tutorial please leave the comments :)

Monday, January 26, 2015

How to create a Vintage Effect Photo in Photoshop CS 6/5

Vintage and retro photography is all in fashion today! People are crazy about Instagram filters and old look in photos it makes even ordinary photos more stylish and vintage.

Photoshop is the best tool to create vintage effect! In this post we are going to Learn about vintage styles. I will explain how to create these effects, its an easy tutorial on how you give a stylish vintage look to your ordinary photos.

There are many ways to reach the vintage effect. Some of them are simple, some are more complex. It doesn't matter which one you will use if your result is cool :)  I am going to start it with simple methods and will explain all of them later.

Vintage Effect - 1:


To create this vintage look open your file using Photoshop CS 6/5 and follow the following steps:
For this tutorial we are using this image.
This photo has taken from this link: 
http://www.netcarshow.com/buick/1953-skylark/800x600/wallpaper_01.htm


Step 1:
Create your image as a layer in Photoshop. Double click the "Background" layer and rename it int "Layer 1" or any other name you want to.


Step 1:
Create and adjustment layer over "Layer 1" by clicking on the icon on the 4th number in below image.


Click on Brightness/Contrast and make following adjustments. You can change the values later according to your image.


Step 2: 
Create another adjustment layer by clicking on Hue/Saturation and make following adjustment.


Step 3: 
Create another adjustment layer by clicking on Curves, select  and make following adjustment.
- click on option button and select "Enhance Per Channel Contrast"
-click on different RED, GREEN AND BLUE channels and adjest their value accordingly.


Step 4: 
Click on "Lens Correction Filer" or Press "Crtl + F" (for Mac users press Cmd + F)
Open Lens correction window and make adjustments according to your camera model.


Step 5: 
Create another adjustment layer by clicking on Hue/Saturation and make following adjustment.


Set Opacity of the layer 58% or according to the look of your photo. It can be changed later.


Step 6: 
Create another adjustment layer by clicking on "Solid Color". Choose the bright Pink color (Color Code: #ff009c) and set the layer Opacity to 6%.


Step 7: 
To create the final look, Add another adjustment layer by clicking on Curves, select  and make following adjustment by dragging the curve point below the slope.


Here our vintage effect is complete and the result is astonishing and stylish! 


I hope you have learned this vintage effect, Now you can apply it to any of your photos to make them more stylish.

I will be uploading more Vintage and other Effects tutorials Very soon. If you like my tutorial please leave the comments :)